This update might be a tad longer than usual so grab a cup of tea, just in case...
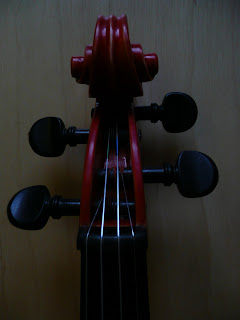
It's actually done! I'm so proud of it I might burst at any minute! This is the violin that I wrote about a year ago, the one that I had hanging in my kitchen window. This spring I've put varnish on it, 14 coats, and simply put the rest together, the bridge and so on. I've showed it to a professional builder and he suggested to lower the nut (which I did) and also to readjust the sound post, I might do that later on, when I have an abundance of patience...those of you that have put a sound post in a violin knows what I'm talking about! I'm also going to let some musicians have a go at it, so I can get their input as well.
This might sound silly, but I'm so pleased with the fact that it actually sounds, it makes sound! Alright, I'm not sure it could fill the Royal Albert Hall with music, but I've got no plans to go there, yet!
Why then have I built this violin, from scratch, out of pieces of wood that doesn't look violiny at all?
Well, as many of the things that I do, it has the basis from a movie! When I went to animation school I saw this french movie, Un coer en hiver (www.imdb.com/title/tt0105682/) with the always brilliant Daniel Auteuil, and Emmanuelle Béart. It's a slow paced love drama where two men falls in love with the same woman. These two men have a violin shop together, and those scenes in that shop, you could feel the craft of it all through the screen. The production must have had a luthier that helped the actors and the set. This was in '98 or '99, and I got the idea that some time in the future I would like to try to build a violin. But since I'm all thumbs, as I've written before in making the violin varnish box, how would that be possible?
Another reason why I wanted to build a violin, is that I like the shape of the instrument, it's kind of the ultimate beautiful object. It's curves and curls, that is present all over the design.
We go forward a couple of years and I get the opportunity to craft knifes, I think this is very important because without those knifes, there would not have been a violin. In making those two knives, that I gave to my father and brother, I kind of reawakened my more practical side and boosted my confidence.
We skip forward a couple of years and in 2004 I enrolled in this violin making class, and I can honestly tell you that I didn't know what I was doing at times. And for sure if they would have had an ability test in the beginning, I would not have been accepted. This has truly been a journey, with frustration, fun, craftiness and work. The reason why it has taken so long is because in the beginning I only worked on it in class, and I didn't do anything at home. This because I didn't know what to do! And I must also confess since this is my first violin, I've made all the mistakes that you possibly can do, well maybe not everyone, I saved a few, for later... In making these mistakes I've truly learned a lot. And let's face it everyone is a beginner at first, even Stradivarius was a beginner... But honestly for some time in the beginning, it really felt that I took one step forward and two steps back. But after a while I thought that if I move a little forward every week, then that's ok and even good! And now we're here!
The reason why it's red? Well...uh...it's...a movie! ;-) A couple of years ago I saw the movie The Red Violin (www.imdb.com/title/tt0120802/). Where we follow a red violin through three centuries, from being made to present day. It's also kind of slow paced. I can recommend it, and from that film I got the idea to make this violin red. The film also has a beautiful soundtrack.
I'm actually already working on my next projects. Hopefully these will not take as long to finish! So this is not the end, I'm going to continue working with these beautiful instruments! I'm looking forward to learn more and to be able to get better results.
Here are some pictures of the violin, as you know by now I'm not a photographer, this meaning that it looks even better in real life!
On the picture above, you see my biggest "mistake", I didn't get the roundness in the back as it should have, actually what I got was what they call a goats back/getrygg. Well, I learned from my mistake and on the belly I got the roundness that it should have.


Inga kommentarer:
Skicka en kommentar