lördag 10 april 2021
Friends Lego Advent calendar 2020
Around Christmas time I usually treat myself to a Star Wars Lego Advent calendar, unfortunately I missed that one last year, so I bought the Friends version instead. As a challenge and to sort of kick start my creativity I try to make new models out of the bricks in the calendar, this time around it was fun to see what was to become out of this set!
fredag 9 april 2021
Folding a box for watercolours
For the visitor to this blog of mine there is no surprise that I have painted a few watercolours lately! Halfway through the project I wanted a box for the paintings and I decided to fold one! Naturally the box can also be used to store other goods or wares!
I will be quite precise to the measurements but that is only to make the idea come across, if you want to make a box in another size, you are welcome to do so; the technique will probably work as well for you as it did for me!
To make this box you will need: two pieces of paper, a ruler, scissor, pencil and possibly a calculator of some sort... You will NOT need scotch tape or glue!
Alright have you got everything? Great, let us get to work then, shall we?
For this box I used a 135 grams drawing paper in A3 format, due to the binding of the pad I had to cut away a small portion of the paper which gave it new measurments: 40,8 x 29,7 centimeters (cm). This is important due to the calculations later on!
First of all I needed to know the size of the bottom of the box. I piled my drawings (half of them) and measured the base of the pile and got the following numbers: 16,5 x 15,5 cm.
To place this "square" in the middle of the paper I subtracted 16,5 cm from the height and 15,5 cm from the width of the paper AND divided those numbers by 2.
The calculations:
40,8 - 16,5 = 24,3
24,3 / 2 = 12,1
29,7 - 15,5 = 14,2
14,2 / 2 = 7,1
With the ruler mark and draw lines across the paper:
12,1 cm from the top and bottom.
7,1 cm from either side.
Take your scissor and cut along the vertical lines to the horisontal lines from the top and bottom, the cut should be 12,1 cm long.
Your paper should now have a square in the middle and the top and bottom of the paper should have cuts where the middle piece should be a bit larger than the two on each side.
We will now turn our attention to this middle piece! Take your ruler, mark and draw a line 7,1 cm from the square on the top and bottom pieces.
By now you should notice that the marked line at 7,1 cm have the same length or height as the fields on the side of the square, this will be the height of the box, 7,1 cm!
At this line, you are now to make a fold.
There should also be folds along all of the sides of the square across the whole piece of paper.
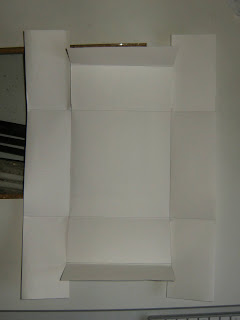
If you have followed the instructions correctly your paper should now look like this! If it does not look like this then something have happened that should not have happened, if you followed my measurements that is!
Now the fun begins!
Fold the sides of the square so that the top "side pieces" goes inside of the "middle piece", like so.
Now take the middle piece and fold it over the two "side pieces", like so.
Repeat at the other side of the square!
Et voila! Your first part of the box is now ready!
If you would like to make a lid for your box you just have to use another paper and the same measurements!
And there it is in all its glory, the watercolours are now safe and sound!
By the way, this is not my first attempt at making package design, in a previous post I have made one for a CD or a DVD disc, you can read about it here:
Take care!
Etiketter:
box,
fold,
låda,
package design,
vika
Prenumerera på:
Kommentarer (Atom)


